- Log in to Planner: Visit tasks.office.com, the Planner website, and log in using your Microsoft credentials.
- Access the plan: Open the plan that you wish to remove. On the Planner dashboard, a list of all your plans ought should be visible.
- Open the plan: To open the plan you wish to remove, click on it.
- Open Plan Preferences: The Planner interface has a gear symbol or three dots (ellipsis) in the upper-right corner. To open the plan options menu, click this symbol.
- Click on Delete plan: There ought to be a delete plan option in the options menu. When prompted, click “Delete plan” and confirm the action.
- Confirm deletion: You might be prompted to verify your want to remove the plan. If prompted, confirm the deletion.
- Plan deletion: After verification, the plan will be permanently removed from Planner, along with all of the tasks connected to it.
It’s crucial to remember that the only people who can remove a plan are the ones who established it or those with administrative authority. You may not have the required rights if you are unable to delete the plan. In these situations, you would need to learn how to delete a plan in planner and ask for help from the Planner administrator at your company.
how to delete a plan in Microsoft Planner
To delete a plan from Microsoft Planner, take these steps:
- login in to Microsoft Planner: Visit the Planner website (tasks.office.com) and login in using your Microsoft account.
- Access the plan: Find the plan that you wish to delete. The Planner dashboard should provide a list of all of your plans.
- Open the plan: To delete a plan, first open it.
- Enter Plan Settings: Look for the three-dot menu (ellipsis) in the upper-right corner of the Planner interface. Click it to open the plan settings menu.
- Choose Delete plan: In the options menu, look for a “Delete plan” option. Click this option.
- Confirm deletion: You may be prompted to confirm that you want to delete the plan. Confirm the deletion if requested.
- Plan deletion: Once confirmed, the plan and any related tasks will be permanently removed from Microsoft Planner.
Please keep in mind that only the plan creator or someone with administrative permissions can delete a plan. learn how to delete plan in planner If you don’t see the option to delete the plan, mircrosoft planner delete plan you may not have the required permissions. In such instances, you should contact your organization’s Planner administrator for help.
FAQ (Frequently Asked questions)
-
Why can’t I Delete a plan in Microsoft planner?
Only plan owners can delete plans. Plan members have the option to leave plans if they choose to. Each plan belongs to a Microsoft 365 Group. If you want to delete both the plan and the group, see Delete a Group in Outlook.
-
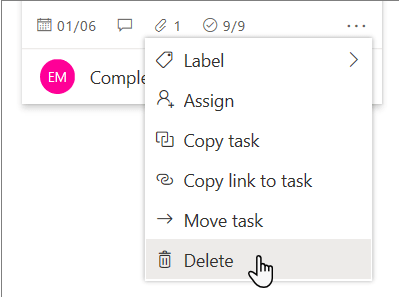
How do I Delete completed tasks in Planner?
- Delete or Remove Completed Tasks from the Planner
- The tasks can be hosted on OneDrive and exported to Excel.
- Eliminate any ongoing tasks and use Excel to turn the data into a table.
- Create a flow that reads from an Excel table and uses Task ID to eliminate tasks. It’s important to adjust the List Rows action’s pagination to 5000; else, it will only parse 256 rows.
3.How do I Delete a group in Microsoft planner?
- To delete your group, choose it under Groups.
- Click the Menu bar and choose Edit Group.
- The Delete group button is now clickable in the window’s lower left corner.
4.Can you recover a deleted plan in Planner?